Do you want to add a milestone countdown in WordPress?
A countdown timer helps you showcase important achievements, anniversaries, upcoming events, and more.
In this article, we will show you how to easily add a countdown timer widget to your WordPress site.
When and Why to Use a Milestone Countdown Widget?
Milestone countdown widgets are a useful tool to remind your audience about an important milestone in your business, such as an upcoming event, product launch, or a sales event.
The countdown helps to build anticipation among your customers and improve user engagement.
Here are some common scenarios where you’d use a milestone countdown widget:
Before launching your website on a coming soon page.
During website maintenance to let visitors know when the website will be available again.
Before introducing a new product in your online store.
When hosting an event or conference.
On the birthday of your online business.
On holidays and sale events such as Black Friday to offer big discounts on your products or services.
You can display the milestone countdown timer in your posts, pages, and sidebar widget area.
Countdown timers can also be added to lightbox popups, floating bars, scroll boxes, and other design elements to engage abandoning site visitors and bring them back to your website.
Since there are so many use-cases of a countdown timer, we have listed 3 different methods for adding a milestone countdown widget in WordPress:
Create Milestone Countdown Widget using Countdown Timer Ultimate
Create Highly Engaging Dynamic Countdown Timers with OptinMonster
Create Coming Soon & Maintenance Mode Countdown Timer with SeedProd
Let’s take a look at how to easily add a milestone countdown widget in WordPress.
Video Tutorial
Subscribe to WPBeginner
If you’d prefer written instructions, just keep reading.
Method 1: Adding a Milestone Countdown Widget Using Countdown Timer Ultimate Plugin
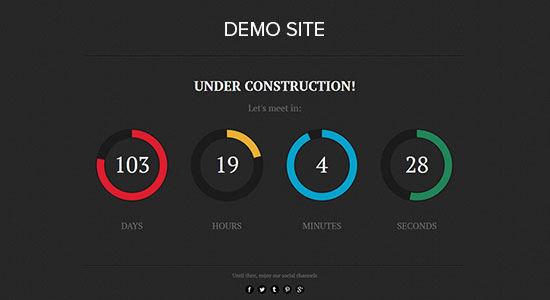
Countdown Timer Ultimate is a simple free plugin that lets you add a basic countdown timer to your website.
First thing you need to do is install and activate the Countdown Timer Ultimate plugin. For more details, see our step by step guide on how to install a WordPress plugin.
Upon activation, you need to visit the Countdown Timer » Add Timer page in your WordPress admin area.
On this page, you need to start by adding your milestone name as the title for the new countdown timer.
Note: The timer uses the timezone set in your WordPress site settings. If you want to change the timezone for this countdown timer, then you will need to go to Settings » General and update the timezone settings of your WordPress site.
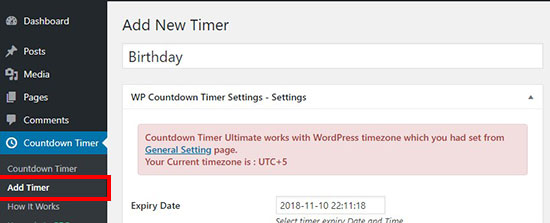
After that, you can scroll down to set an expiration date, day, and time for your milestone countdown timer.
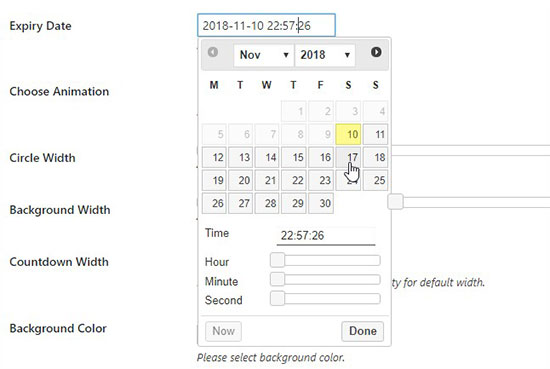
Next, you need to select an animation style from the drop-down. You can also adjust the circle and background width easily.
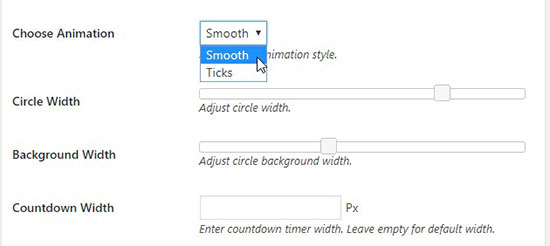
In the Countdown Width field, you can define a width for the full display of your countdown widget. If you leave this field blank, then it will display the timer using the default size.
After that, you can add the background and foreground color for the countdown timer. You can individually change the color for days, hours, minutes, and seconds. You can also change the labels for elements like days, hours, etc.
One thing to keep in mind is that the plugin unfortunately doesn’t adjust the label for plural or singular, so for example it will say “1 Hours” instead of “1 Hour”.
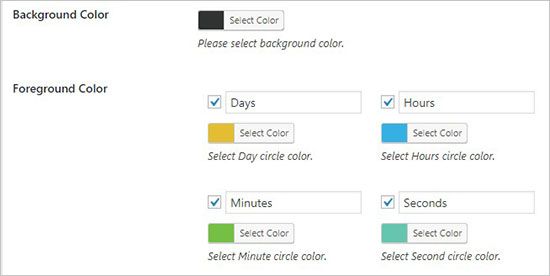
Once you are satisfied with the settings, go ahead and click on the ‘Publish’ button.
Displaying Your Milestone Countdown Widget in WordPress
Now that you have created your milestone countdown widget, let’s add it to your website.
First, you need to click on the Countdown Timer menu. On the WP Countdown Timer page, you will see the timer you just created listed there.
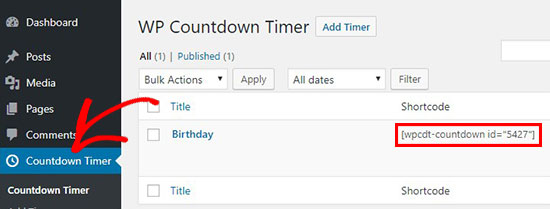
Next to your countdown timer, you will see a shortcode that you need to copy.
You need to copy and paste this shortcode in the content area of your post or page. Then, make sure to click on the update or publish button to save your changes.
You can now visit your website to see the milestone countdown widget in action.
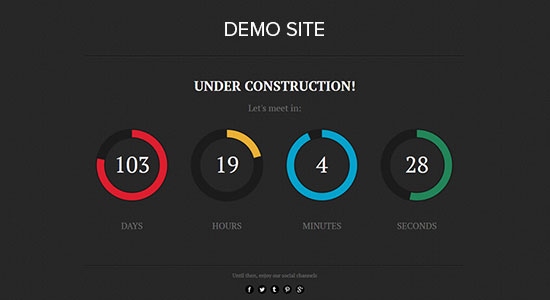
You can also add this countdown timer in the sidebar of your WordPress site. Simply go to Appearance » Widgets page and add a ‘Text’ widget to your sidebar. In widget settings, you need to paste the shortcode for your countdown timer.
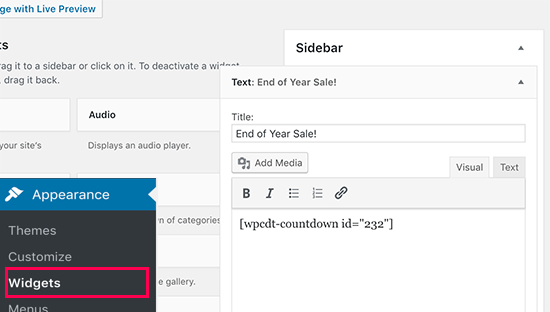
Once you’re done, don’t forget to click on the Save button to store your widget settings.

Method 2: Adding a MileStone Countdown Widget Using OptinMonster
OptinMonster is the best WordPress popup plugin on the market, but it does much more than just popups. It helps you convert abandoning site visitors into subscribers and customers.
Using the countdown timer feature by OptinMonster, you can integrate the milestone countdown timer into a lightbox popup, sidebar widget, floating bar, or any other OptinMonster campaign type.
Below is an example of one of the pre-made countdown timer campaigns they have, but you can use drag & drop builder to create a completely customized countdown timer.

OptinMonster is a smart way to show a countdown timer in highly attention-grabbing design elements. They even allow you to create evergreen countdown timers in WordPress.
An evergreen countdown timer starts a countdown for each individual visitor. The timer begins when the person arrives on your site. It’s also referred to as a dynamic countdown timer.
First you need to visit the OptinMonster website and signup for a plan that meets your need.

After that, you need to install the OptinMonster plugin on your WordPress site. For more details, see our step by step guide on how to install a WordPress plugin.
This plugin will work as a connector between your WordPress site and the OptinMonster app.
Upon activation, you’ll need to go to OptinMonster » Settings from your WordPress admin menu and connect your account.
You can click the ‘Connect an Existing Account’ button to get started.

After that, you’ll see a popup window appear. Simply select the email address you used to sign up for an OptinMonster account and click the ‘Connect to WordPress’ button.
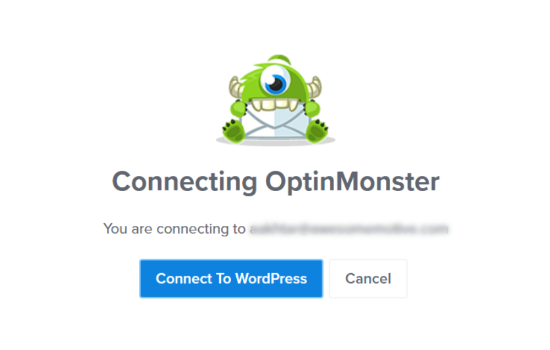
The plugin will now connect your WordPress site to your OptinMonster account.
Once connected, you can start creating a new campaign from your OptinMonster dashboard. Simply head over to OptinMonster » Campaigns and click the ‘Create Your First Campaign’ button.
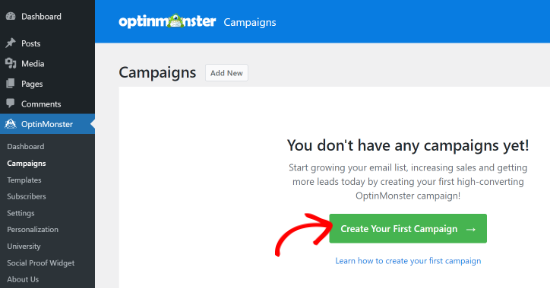
You can use any campaign type and integrate the countdown timer into it.
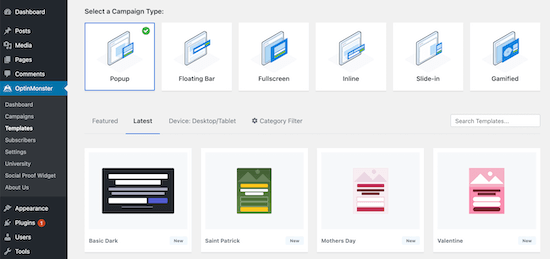
For more details, see this step by step tutorial on how to create a countdown timer campaign in OptinMonster.
Method 3: Adding a Milestone Countdown Widget Using SeedProd
SeedProd is the best landing page builder for WordPress. Its drag and drop builder lets you create amazing landing pages and add a countdown timer to grab your visitors attention.
To use the countdown timer feature, you will need the SeedProd Pro version. With the Pro plan, you can also get access to different templates, page blocks for customization, email marketing integrations, and more.

The first thing you need to do is to install and activate the SeedProd Pro plugin on your WordPress website. For more details, see our step by step guide on how to install a WordPress plugin.
Upon activation, you’ll be redirected to SeedProd in your WordPress admin area. It will ask for a license key that you can get from your SeedProd account. After entering the license key, you can click the ‘Verify key’ button.
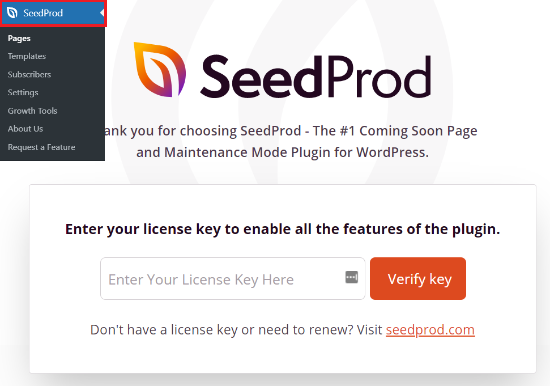
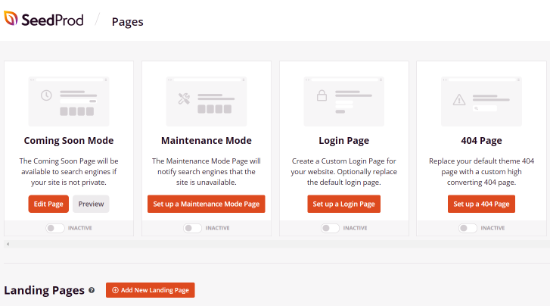
Next, you can create a new landing page by going to SeedProd » Pages.
SeedProd lets you set up different types of pages, including coming soon pages, login pages, custom WooCommerce cart pages, and a 404 pages.
You can also create other landing pages by clicking the ‘Add New Landing Page’ button, such as a thank you or a page to signup for a webinar.
For this tutorial, we’ll be using the Coming Soon page as it’s a great place to add a countdown timer and remind your audience about an upcoming product or event.
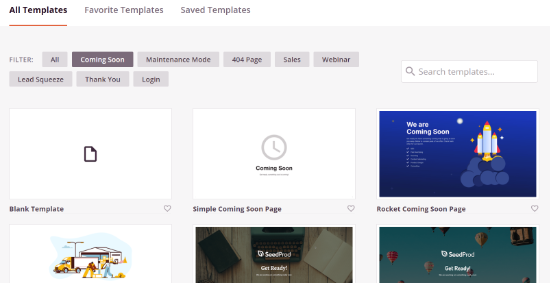
After that, you can select a template for your landing page. There is also an option to create a page from scratch by using the blank template.
However, we recommend using a template as it saves time and helps you edit the design the way you want.
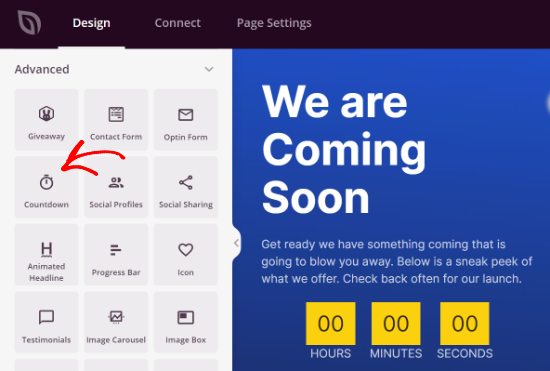
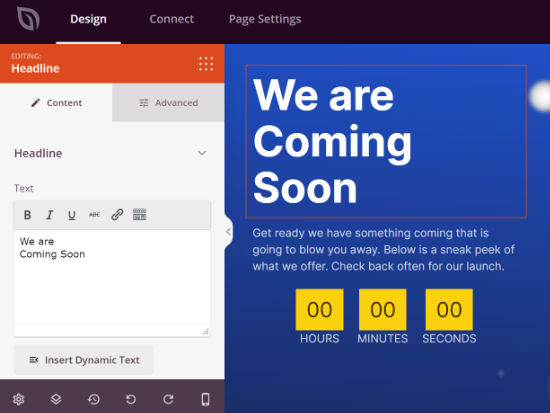
On the next screen, you’ll be taken to the SeedProd drag and drop page builder under the Design tab.
Here, you can customize the landing page by adding and removing different sections, page blocks, and formatting the page’s layout.
To add the countdown timer, simply go to the Advanced page blocks section from the left menu and place the ‘Countdown’ block anywhere on your page.
You can also edit different sections of your coming soon page. Just click on a section and you’ll see more options on the left menu.
For example, you can edit the text in the field, change its font, color, or align the content.
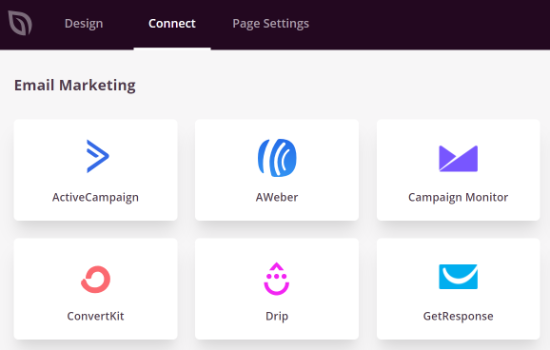
When you’re done editing the design of your landing page, you can go to the Connect tab and integrate email marketing services. SeedProd supports popular services such as Drip, Constant Contact, SendinBlue, ConvertKit, and more.
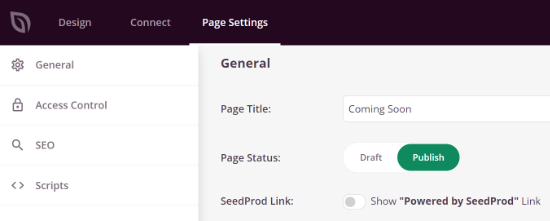
After that, go ahead and click on the Page Settings tab to publish your landing page with a countdown timer.
Under the General settings, you can change the ‘Page Status’ from Draft to Publish, and your page will be live.
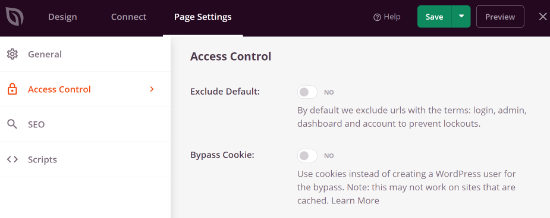
Next, you can go to the ‘Access Control’ settings under the Page Settings tab and manage who can view your landing page.
This feature is really useful if you want certain people to bypass the coming soon page and work on developing your website.
SeedProd also lets you include and exclude URLs on which the coming soon page will be shown. By default, the page will be visible on the entire website. However, you can change it to show only on the homepage or on specific URLs.
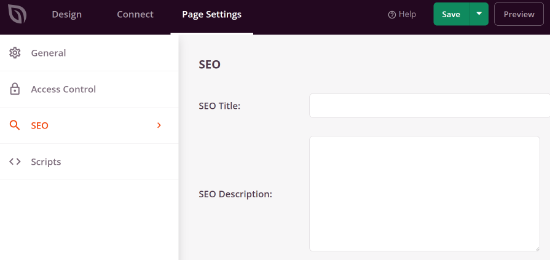
After that, you can optimize your page for search engines by going to the SEO settings.
SeedProd lets you add an SEO title, description, favicon, and social media thumbnail.
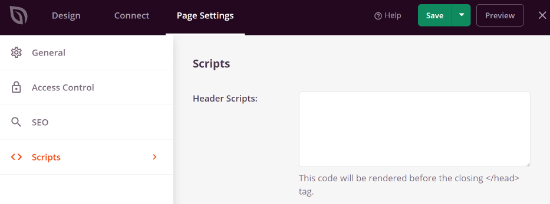
If you want to add code snippets to your landing page, then head over to the ‘Scripts’ section in Page Settings. Here you can add scripts in the header, body, and footer of your page.
For example, you can add the Google Analytics tracking code in the Header Scripts to see how people use your landing page.
Once you are satisfied, make sure to click on the Save button. You can also preview your landing page to make any changes to its design.
Next, you’ll have to go to SeedProd » Pages and change the status of your coming soon page to ‘Active.’
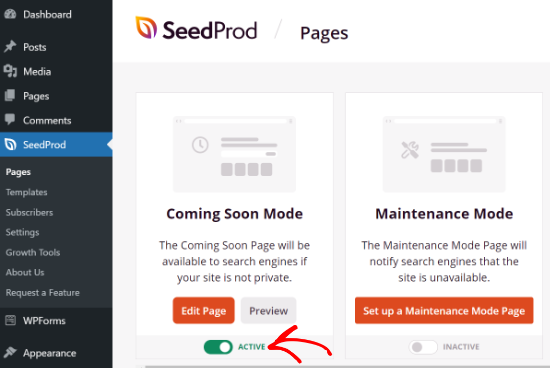
You can now visit your website to see the coming soon counter in action.

We hope this article helped you learn how to add a milestone countdown widget in WordPress. You may also want to see our guide on proven ways to make money online blogging with WordPress, or our complete guide on how to create an email newsletter.
If you liked this article, then please subscribe to our YouTube Channel for WordPress video tutorials. You can also find us on Twitter and Facebook.