Did you know that WordPress has the ability to schedule your posts to be published at a future time? This extremely useful feature is slightly hidden which is why many beginners don’t even notice it.
By scheduling your posts, you never have to worry about publishing your articles at a specific time. You can finish writing and schedule them to go live on the day and time that you choose.
In this article, we will show you how to easily schedule WordPress posts step by step and share some bonus tips to use WordPress scheduled posts like a Pro.
Why Schedule Posts in WordPress?
To create a successful blog, the best strategy is to plan your editorial calendar and publish articles on a regular basis.
That’s where schedule posts feature comes in handy. You can write your articles at your own pace and get ahead on your editorial calendar. Once you finish writing, you can schedule the post to be published at a specific date and time.
Another reason to schedule your posts is to benefit from peak traffic hours. There is a certain time in a day when each website gets the peak of their users. By publishing at that time, you can leverage existing traffic to increase your page views.
Now if you live in a different time zone than your readers, then it can be a problem. Imagine having your peak time as 3 a.m. where you live. Scheduling posts can be very handy for this.
Scheduling posts also comes in handy when you are going on vacation. You can simply schedule your blog posts and enjoy your holidays without worrying about writing and publishing content.
Now that you understand the benefits, let’s take a look at how to actually schedule your blog posts in WordPress.
Video Tutorial
Subscribe to WPBeginner
If you’d prefer written instructions, just keep reading.
How Do You Schedule a Post in WordPress?
It is easy to schedule WordPress posts if you know where to look. The option to schedule blog posts is not easily noticeable.
Once you have finished writing your blog post, you need to look under the ‘Document’ tab in the right column of the edit screen.
Under the ‘Status & Visibility’ panel, you need to click on the ‘Immediately’ link next to ‘Publish’ option.
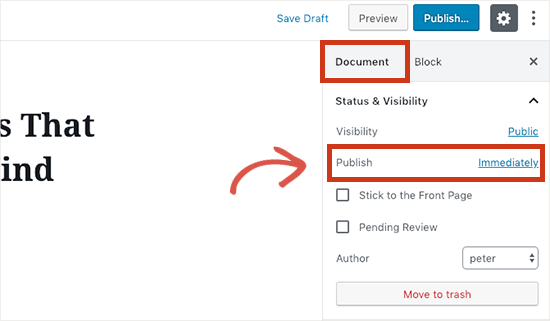
This will show you a date and time picker. You can select the date and time when you want to publish this post.
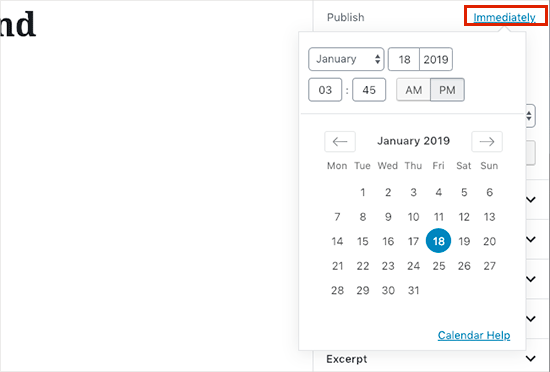
You can select a future date and time to schedule your article in WordPress.
You can also select a past date using the same tool to back date your blog post.
When you select a future date, you will notice that the publish button at the top will change into ‘Schedule…’.
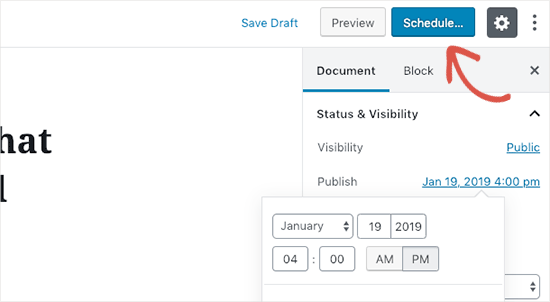
Simply click on the Schedule button and WordPress will schedule your post.
The scheduled posts will be automatically published on the date and time you choose.
How to Schedule WordPress Posts in Classic Editor
If you are using the classic WordPress editor, then we highly recommend you to start using the new WordPress block editor, called Gutenberg.
The new WordPress editor is incredibly fast, modern, intuitive, and helps you create better content for your blog.
However, if you still want to use the older classic editor, then here is how you would schedule posts in WordPress.
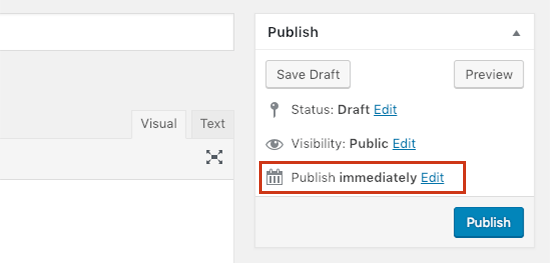
Once you are done writing your post, look under the ‘Publish’ meta box in the right column of the edit screen and click on the ‘Edit’ link next to ‘Publish immediately’ option.
It will now show you the date and time options. Go ahead and enter the date and time when you want to publish your blog post and click on the OK button.
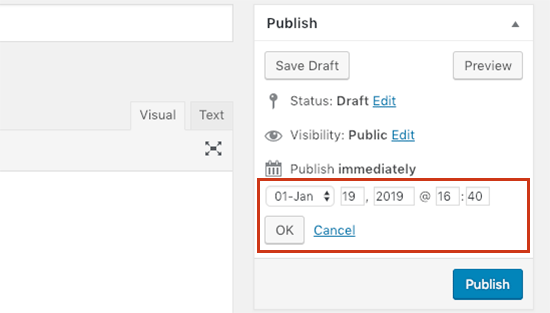
You’ll notice that the blue ‘Publish’ button will now change into ‘Schedule’. Go ahead and click on the schedule button to save your changes.
WordPress will now publish your blog post on the date and time you entered.
Troubleshooting WordPress Scheduled Posts
As your website grows, you will be regularly managing and scheduling WordPress posts. Following are some handy tips that will help you efficiently manage your scheduled posts in WordPress.
How do I use my own timezone in WordPress?
You need to change WordPress timezone settings, so that it uses your preferred timezone to publish scheduled posts.
How to view all scheduled posts in WordPress?
Simply go to Posts » All Posts page in your WordPress admin and then click on the ‘Scheduled’ link above the posts table. It will show all scheduled WordPress posts in the queue.
What to do if WordPress scheduled posts missed schedule?
To run scheduled tasks, WordPress uses a system called WP Cron. If the cron is unable to run due to a misconfiguration on your WordPress hosting server, then your scheduled posts will miss the schedule and won’t be published.
If you notice that your blog is affected by this, then you can install Missed Scheduled Posts Publisher plugin.
To learn more, see our article on how to fix the missed schedule post error in WordPress.
How to unschedule a WordPress post?
You can unschedule a WordPress post by editing the post and changing its status from ‘Scheduled’ to ‘Draft’.
In the new default WordPress editor, you will find the option to switch to draft at the top. In the classic editor, you will find it under the publish meta box.
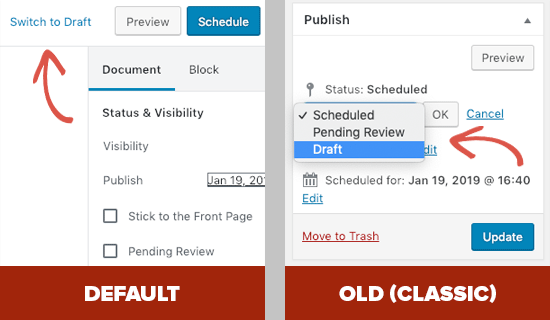
After you have changed a scheduled post to a draft, you can continue working on it, or you can publish it right-away if you want.
Can I also schedule WordPress pages?
Yes, you can schedule a WordPress page just like you would schedule a normal blog post.
Can I schedule changes to a published post or page in WordPress?
By default, you cannot schedule changes to a post or page you have already published. Any changes you make to a published post will become live as soon as you save it.
However, you can use the Tao Schedule Update plugin to make scheduled content updates.
For more details, please see our tutorial on how to schedule content updates in WordPress.
We hope this article helped you learn how to easily schedule your blog posts in WordPress. You may also want to see our guide on how to do keyword research for your WordPress blog to find blog post ideas and get more traffic.
If you liked this article, then please subscribe to our YouTube Channel for WordPress video tutorials. You can also find us on Twitter and Facebook.