如果您正在为客户开发 WordPress 网站,那么您很可能会有供客户使用的短代码。问题是很多初学者不知道如何添加简码,如果涉及复杂的参数,那就更难了。Shortcake 通过为简码添加用户界面来提供解决方案。在本文中,我们将向您展示如何使用 Shortcake 在 WordPress 中为短代码添加用户界面。
什么是脆饼?
WordPress 提供了一种更简单的方法,可以使用简码在帖子和页面中添加可执行代码。许多 WordPress 主题和插件允许用户使用简码添加额外的功能。但是,有时当用户需要输入参数进行自定义时,这些简码会变得复杂。
例如,在典型的 WordPress 主题中,如果有一个短代码来输入一个按钮,那么用户可能需要添加至少两到五个参数。像这样:
[themebutton url=”http://example.com” title=”立即下载” color=”purple” target=”newwindow”]
Shortcake 是一个 WordPress 插件,也是一个提议的未来 WordPress 功能。它旨在通过提供一个用户界面来输入这些值来解决这个问题。这将使简码更易于使用。

入门
本教程面向不熟悉 WordPress 开发的用户。喜欢调整 WordPress 主题的初级用户也会发现本教程很有帮助。
话虽如此,让我们开始吧。
您需要做的第一件事是安装并激活Shortcake (Shortcode UI)插件。
您现在需要一个接受一些用户输入参数的简码。如果您需要复习一下,这里是如何在 WordPress 中添加短代码。
为了本教程的目的,我们将使用一个简单的短代码,允许用户在他们的 WordPress 帖子或页面中插入一个按钮。这是我们的短代码的示例代码,您可以通过将其添加到主题的函数文件或特定于站点的插件中来使用它。
add_shortcode( ‘cta-button’, ‘cta_button_shortcode’ ); function cta_button_shortcode( $atts ) { extract( shortcode_atts( array( ‘title’ => ‘Title’, ‘url’ => ” ), $atts )); return ‘‘;}
您还需要添加一些 CSS 来设置按钮样式。您可以在主题的样式表中使用此 CSS。
.cta-button {padding: 10px;font-size: 18px;border: 1px solid #FFF;border-radius: 7px;color: #FFF;background-color: #50A7EC;}
这是用户在他们的帖子和页面中使用简码的方式:
[cta-button title=”Download Now” url=”http://example.com”]
现在我们有了一个接受参数的简码,让我们为它创建一个 UI。
使用 Shortcake 注册您的简码用户界面
Shortcake API 允许您注册您的简码的用户界面。您将需要描述您的简码接受哪些属性、输入字段类型以及哪些帖子类型将显示简码 UI。
这是一个示例代码片段,我们将使用它来注册我们的短代码的 UI。我们试图用内联注释来解释每个步骤。您可以将其粘贴到主题的函数文件或特定于站点的插件中。
shortcode_ui_register_for_shortcode( /** Your shortcode handle */’cta-button’, /** Your Shortcode label and icon */array( /** Label for your shortcode user interface. This part is required. */’label’ => ‘Add Button’, /** Icon or an image attachment for shortcode. Optional. src or dashicons-$icon. */’listItemImage’ => ‘dashicons-lightbulb’, /** Shortcode Attributes */’attrs’ => array( /*** Each attribute that accepts user input will have its own array defined like this* Our shortcode accepts two parameters or attributes, title and URL* Lets first define the UI for title field. */ array( /** This label will appear in user interface */’label’ => ‘Title’, /** This is the actual attr used in the code used for shortcode */’attr’ => ‘title’, /** Define input type. Supported types are text, checkbox, textarea, radio, select, email, url, number, and date. */’type’ => ‘text’, /** Add a helpful description for users’description’ => ‘Please enter the button text’,), /** Now we will define UI for the URL field */ array(‘label’ => ‘URL’,’attr’ => ‘url’,’type’ => ‘text’,’description’ => ‘Full URL’,),),), /** You can select which post types will show shortcode UI */’post_type’ => array( ‘post’, ‘page’ ), ));
就是这样,您现在可以通过编辑帖子来查看正在运行的简码用户界面。只需单击帖子编辑器上方的添加媒体按钮。这将打开媒体上传器,您会在其中注意到左侧栏中的新项目“插入帖子元素”。单击它将显示一个用于插入代码的按钮。
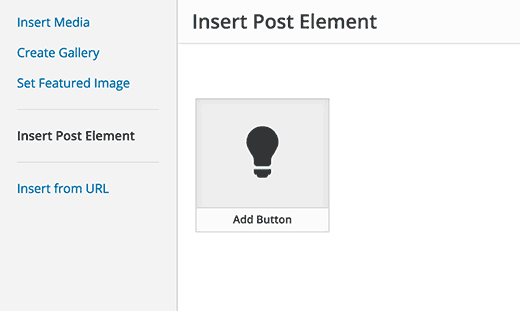
单击包含灯泡图标和您的脆饼标签的缩略图将向您显示简码 UI。
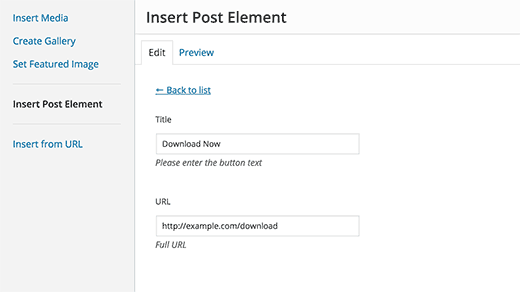
添加具有多个输入的简码
在第一个示例中,我们使用了一个非常基本的简码。现在让我们让它更复杂一点,更有用。让我们添加一个允许用户选择按钮颜色的简码。
首先,我们将添加短代码。它几乎是相同的简码,只是它现在不包括用户输入的颜色。
add_shortcode( ‘mybutton’, ‘my_button_shortcode’ ); function my_button_shortcode( $atts ) { extract( shortcode_atts( array( ‘color’ => ‘blue’, ‘title’ => ‘Title’, ‘url’ => ” ), $atts )); return ‘‘;}
由于我们的简码将以不同的颜色显示按钮,因此我们也需要更新 CSS。您可以在主题的样式表中使用此 CSS。
.mybutton { padding: 10px; font-size: 18px; border: 1px solid #FFF; border-radius: 7px; color: #FFF;} .blue-button { background-color: #50A7EC;}.orange-button { background-color:#FF7B00;} .green-button { background-color:#29B577;}
这是按钮的外观:
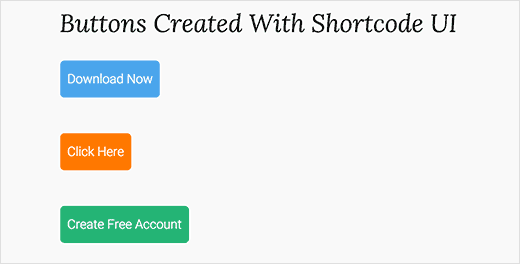
现在我们的简码已经准备好了,下一步就是注册简码 UI。我们将使用基本相同的代码,只是这次我们有另一个颜色参数,并且我们为用户提供了从蓝色、橙色或绿色按钮中进行选择的功能。
shortcode_ui_register_for_shortcode( /** Your shortcode handle */’mybutton’, /** Your Shortcode label and icon */array( /** Label for your shortcode user interface. This part is required. */’label’ => ‘Add a colorful button’, /** Icon or an image attachment for shortcode. Optional. src or dashicons-$icon. */’listItemImage’ => ‘dashicons-flag’, /** Shortcode Attributes */’attrs’ => array( /*** Each attribute that accepts user input will have its own array defined like this* Our shortcode accepts two parameters or attributes, title and URL* Lets first define the UI for title field. */ array( /** This label will appear in user interface */’label’ => ‘Title’, /** This is the actual attr used in the code used for shortcode */’attr’ => ‘title’, /** Define input type. Supported types are text, checkbox, textarea, radio, select, email, url, number, and date. */’type’ => ‘text’, /** Add a helpful description for users */’description’ => ‘Please enter the button text’,), /** Now we will define UI for the URL field */ array(‘label’ => ‘URL’,’attr’ => ‘url’,’type’ => ‘text’,’description’ => ‘Full URL’,), /** Finally we will define the UI for Color Selection */array(‘label’ => ‘Color’,’attr’ => ‘color’, /** We will use select field instead of text */’type’ => ‘select’, ‘options’ => array( ‘blue’ => ‘Blue’, ‘orange’ => ‘Orange’, ‘green’ => ‘Green’, ),), ), /** You can select which post types will show shortcode UI */’post_type’ => array( ‘post’, ‘page’ ), ));
就是这样,您现在可以编辑帖子或页面,然后单击“添加媒体”按钮。您会在“插入帖子元素”下注意到您新添加的短代码。
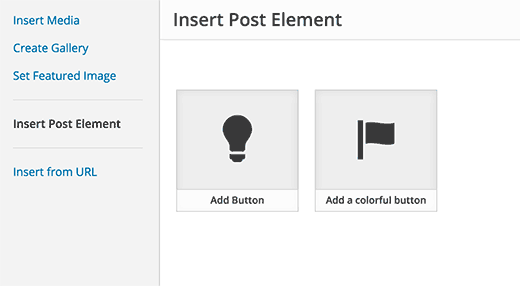
单击新创建的简码将显示简码 UI,您可以在其中简单地输入值。
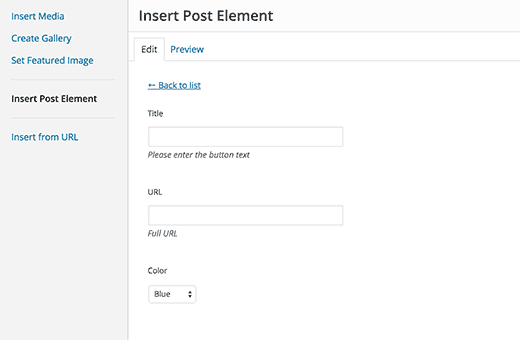
您可以下载本教程中使用的代码作为插件。
wpb-shortcake-教程
我们已经包含了 CSS,因此您可以使用它来学习或使用它来使用更简单的用户界面在 WordPress 中添加您自己的号召性用语按钮。随意修改源代码并使用它。
我们希望本文能帮助您了解如何使用 Shortcake 在 WordPress 中为短代码添加用户界面。您可能还想看看这7 个在 WordPress 中使用短代码的基本技巧。